Monday, January 29, 2018

Spelling Dice


Here's a fun way to get kids to practice their spelling words.  I got the dry-erase die, dry-erase writing tablet and markers at the Dollar Tree.  I drew pictures on each face of the die.


I took this activity even further by having my daughter count the number of times she rolled each picture.  Then we discussed which picture came up the most often, least often and which ones came up the same amount of times. A great beginning to statistics!


Valentine's Crochet Kid's Skirt


Crochet Kids Skirt Instructions

Abbreviations (US Terms)
ch - chain
dc - double crochet
sc - single crochet
sl - slip
st - stitch
hdc - half double crochet

Notes
Weave ends as you work
Stitch count is at end of round in ( )
Join rounds with sl st to first st
These instructions make a size 10/12 skirt with 5 skeins of Lion Brand Bulky Charisma Yarn


Round 1 - ch 70, Join with sl st to first ch
Round 2 - ch 1, sc in each ch to end (70 sc)
Round 3 - (belt loops) ch 4 (counts as ch 1 + dc), skip 1, [dc in next st, ch 1, skip 1]
repeat to end (35 dc)
Round 4 - ch 3, dc around (70)
Round 5-7 - Repeat Round 4
Round 8 - Join Color 2, ch 1, [sc & dc in next st, skip 1] repeat to end, join (70)
Round 9 - ch 1, turn, *[sc, dc, sc, dc] in next sc, skip dc, [sc, dc] in next sc]*
repeat between *’s to end, join (106 not incl ch)
Round 10 - ch 1, turn, [sc, dc] in each sc to end, join (106 not incl ch)
Round 11-29 Repeat Round 10, joining different colors if desired (106 not incl ch (or 53 [sc, dc])
Round 30 - ch 1, turn, [sc in next sc, ch 2] repeat to end, join (53 sc)
Round 31 - Turn, sl st into next ch space, ch 5 (counts as hdc + 3 ch), [hdc in next ch space, ch 3],
repeat to end, join
Round 32 - Repeat Round 31
Round 33 - Turn, ch 1, [sc, hdc, sc in each ch space] Repeat to end, join

Drawstring - I used all of the yarn that I used in the skirt and braided it to make the drawstring.


Saturday, January 27, 2018

Cold or Flu?


The flu has run rampant this year and has come to our house.  I have heard several sad stories of children in the US dying of the flu and so thought I would send out a warning to all parents so that they know when to be concerned.

When to visit Urgent Care - Fever over 104 degrees Fahrenheit, difficulty or pain when breathing, severe chest or abdominal pain, confusion or dizziness, severe vomiting or diarrhea, bluish color to skin, stiff neck (and in infants, fever over 100.3 degrees Fahrenheit, no tears when crying, unable to eat, few wet diapers) 

When to call the doctor - Fever over 101 degrees Fahrenheit, coughing up or blowing out yellow or green colored mucus, rash that accompanies fever, getting better and then starting to feel bad again, those who fit the description of being at high risk for developing complications (see below) 

The reason the flu is so dangerous is that it can lead to more serious complications like bronchitis, sinus and ear infections or pneumonia.  Young children, adults over 65 years of age, pregnant women and people (like me) with chronic illness such as lupus or COPD are more at risk for developing severe complications from the flu.

SymptomColdFlu
Acute Symptomsx
Body Achesx
Chillsx
Coughingxx
Diarrheax
Fatiguex
Feverx
Gradual symptomsx
Headachex
Nauseax
Runny Nosexx
Sneezingxx
Sore Throatxx
Stuffy Nosexx

Sources: CDCVicks, VeryWell, Everyday Health

517 Rocks


The County we moved to has this cool program called 517 Rocks. It's on Facebook. I have no idea who started it but it's a community initiative where people paint and place rocks in public places for others to find. Anyone can participate. You can start one in your community if there isn't one! I think my daughter and I are going to paint some rocks. ;) 

To check out the Facebook page, click here!

Thursday, January 25, 2018

Knitting Loom Infinity Scarf - Short

Bulky Infinity Scarf


For this project, I used 1 Skein of Lion Brand Homespun Thick & Quick.  I also used a long knitting loom and hook.


First, make a slip-knot and attach it to the peg on one end of the loom.


There are several ways to use a knitting loom.  These directions make a really nice, thick scarf.  Wrap pegs on the opposite side from the end the yarn is hooked to so that the yarn crosses over itself.


I wanted this scarf to be really wide so I went all the way to the end of the loom.  If you want a more narrow scarf you can stop anywhere on the loom.  Go ahead and experiment.  If you need more detailed instructions for a thinner scarf check out this blog post

Once you get to the end (or wherever you stop), push the loops down to the bottom of the pegs to make room for the second row.


Then turn around and go back the opposite way wrapping just like you did before so that the yarn crosses over itself.  Now you have two loops on each hook except for the very first one farthest from the yarn tail.


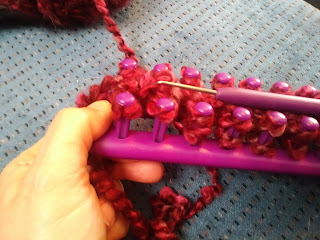
Wrap the yarn around the peg at the end to hold it in place and then use your hook to lift the bottom loop over the top and off of each peg.


Continue down both sides until all pegs have only one loop on each.


Push the remaining loops down to the bottom of the pegs so that you can start wrapping another row.


Wrap another row in the same way so that there are two loops on all but the first peg again.


Keep going in this way and your product should look much like the picture above.  Occasionally pull gently on the emerging scarf to keep it from bunching up and getting in your way.


When your scarf is the length that you want it (or you are down to about two feet of yarn) you will need to cast it off of the loom.  This is easiest to do with a crochet hook, although you can use your knitting loom hook as well.  Start at the end opposite the tail, go under the loop and lift it off the peg.


Then go under the loop across from that peg and lift that loop off the peg.  You now have two loops on your hook.


Lift the back loop, the one you hooked on first, over the loop closest to the hook.  Now you have only one loop on your hook again.


Keep going across from peg to peg pulling the back loop over the front loop until you make it to the end and the scarf is no longer connected to the loom.  Then pull the tail all the way through the last loop to tie it off.  


The tail needs to be about 2 feet so that you can sew the ends of the scarf together to make an infinity scarf. However, if you didn't make it long enough you can always sew the scarf with a different color yarn.


Now you have a regular scarf.  If you choose not to make it an infinity scarf, then you can just weave in the ends and you are done.  However, if you want an infinity scarf (a scarf where the ends are connected together) then follow the next instructions.


Get a large needle, metal or plastic is fine, and thread the long tail.


Put the ends together and start sewing.  Try to match up the ends so that the corners touch.  Sew through both holes in the ends of the scarf, then pull the needle through and over the end of the scarf.  Push the needle through the next set of holes on the same side as last time.  Once you make it to the end, tie off and cut the tails.  Turn your infinity scarf inside out and you are all set to wear it.


The infinity scarf can be worn as above where I just put it over my head and then bunched it in front to keep my neck warm, or you can wear it over your head and around your neck.  Enjoy!

Knitting Loom Infinity Scarf - Long

Bulky Infinity Scarf - Long


For this project, I used 2/3 of a long knitting loom and 1 Skein of Lion Brand Homespun Thick & Quick (in a different color than is shown in the picture above). 


Start by making a slip-knot and attaching it to the peg on one end of the loom.


There are several ways to use a knitting loom.  These directions make a really nice, thick scarf.  Wrap pegs on the opposite side from the end the yarn is hooked to so that the yarn crosses over itself.


Continue wrapping until the preferred width of your scarf is achieved.  (For more detailed instructions for a wider scarf, using the entire loom, click here.)  Then push the loops down to the bottom of the pegs to make room for the second row.


When you get to the peg you wish to stop at (or the end of the loom) turn around and begin wrapping in the other direction in the same way as before, with the yarn crossing over itself.  As you can see from the picture, each peg now has two loops on it except for the end peg farthest from the yarn tail.


Wrap the yarn around the peg at the end to hold it in place and then use your hook to lift the bottom loop over the top loop and off of each peg.  Continue down both sides until all pegs have only one loop on each.


Push the remaining loops down to the bottom of the pegs so that you can start wrapping another row.


Keep going in this way and your product should look much like the picture above.  Occasionally pull gently on the emerging scarf to keep it from bunching up and getting in your way.  


When your scarf is the length that you want it (or you are down to about two feet of yarn) you will need to cast it off of the loom.  This is easiest to do with a crochet hook, although you can use your knitting loom hook as well.  Start at the end opposite the tail, go under the loop and lift it off the peg.


Next, go under the loop across from that peg and lift that loop off the peg.  Now, you have two loops on your hook.  


Lift the back loop, the first one you hooked, over the loop closest to the hook.  Now you have only one loop on your hook again.


Keep going across from peg to peg pulling the back loop over the front loop until you make it to the end and the scarf is no longer connected to the loom.  Then pull the tail all the way through the last loop to tie it off.


When you get to the end and only have one loop on your hook, pull the tail through the last hook to tie off.  The tail needs to be about 2 feet so that you can sew the ends of the scarf together to make an infinity scarf.  However, if you didn't make it long enough you can always sew the scarf with a different color yarn.


To create an infinity scarf, thread a needle, lay the scarf flat and line the ends up together.


Try to match up the ends so that the corners touch.  Sew the ends together with a simple stitch, going through matching holes in the two ends, pulling through and then circling around to pull through again.  Once you reach the end with the tail from the beginning of the yarn, tie off and tuck in ends.  Turn your infinity scarf inside out and you are all set to wear it.


Enjoy!

First Blog Post

We recently moved from the city to an 1880's farmhouse on 8 acres off of a two-lane dirt road.  My daughter turned 6 at the end of Novem...